生成 GPG 公钥
GPG(GNU Privacy Guard)公钥是用于加密和验证数据的重要工具。它可以用于保护您的电子邮件通信、验证软件包的完整性以及签名文档。
在不同的操作系统中获取 GPG 公钥的方法略有不同。以下是针对 Windows、macOS 和 Linux 系统的详细步骤:
Windows系统获取GPG公钥
安装GPG
- 访问 官方Gpg4win网站 下载Gpg4win安装包。
- 运行下载的安装程序并按照提示完成安装。
生成和导出GPG公钥
打开 命令提示符 或 PowerShell ,然后使用以下命令:
生成新的GPG密钥对(如果您还没有):
gpg --full-generate-key
按照页面提示生成GPG 密钥:
Please select what kind of key you want:
    (1) RSA and RSA
    (2) DSA and Elgamal
    (3) DSA (sign only)
    (4) RSA (sign only)
    (9) ECC (sign and encrypt) *default*
    (10) ECC (sign only)
    (14) Existing key from card
Your selection? 1                        //建议选择 RSA and RSA类型的密钥
RSA keys may be between 1024 and 4096 bits long.
What keysize do you want? (3072) 4096    //为保障安全性,建议长度为 4096
Requested keysize is 4096 bits
Please specify how long the key should be valid.
    0 = key does not expire
    <n>  = key expires in n days
    <n>w = key expires in n weeks
    <n>m = key expires in n months
    <n>y = key expires in n years
Key is valid for? (0)                     //根据需要配置 GPG 密钥有效期
Key does not expire at all
Is this correct? (y/N) y                  //再次确认配置
GnuPG needs to construct a user ID to identify your key.

Real name: gitcode                        //配置您的姓名
Email address: email@gitcode.com          //配置您的邮箱,注意邮箱必须要与 GitCode 的默认邮箱一致
Comment:
You selected this USER-ID:
    "gitcode <email@gitcode.com>"

Change (N)ame, (C)omment, (E)mail or (O)kay/(Q)uit? o  //配置不变,之后会弹出密码输入框,输入密码后继续
列出GPG密钥,以找到您的公钥 ID:
gpg --list-keys
导出GPG公钥(替换 YOUR_KEY_ID 为您的公钥 ID):
gpg --armor --export YOUR_KEY_ID
通过软件直接生成和导出GPG公钥
除了上述命令行的方式,我们也可以通过刚才安装的 Kleopatra 软件创建并导出 GPG 公钥,注意邮箱必须要与 GitCode 的默认邮箱一致。
macOS系统获取GPG公钥
安装GPG Suite
- 访问 官方GPG Suite网站 下载GPG Suite。
- 打开下载的
.dmg安装包并按照提示完成安装。
生成和导出GPG公钥
打开 终端,然后使用以下命令:
生成新的GPG密钥对(如果您还没有):
gpg --full-generate-key
按照页面提示生成GPG 密钥:
Please select what kind of key you want:
    (1) RSA and RSA
    (2) DSA and Elgamal
    (3) DSA (sign only)
    (4) RSA (sign only)
    (9) ECC (sign and encrypt) *default*
    (10) ECC (sign only)
    (14) Existing key from card
Your selection? 1                        //建议选择 RSA and RSA类型的密钥
RSA keys may be between 1024 and 4096 bits long.
What keysize do you want? (3072) 4096    //为保障安全性,建议长度为 4096
Requested keysize is 4096 bits
Please specify how long the key should be valid.
    0 = key does not expire
    <n>  = key expires in n days
    <n>w = key expires in n weeks
    <n>m = key expires in n months
    <n>y = key expires in n years
Key is valid for? (0)                     //根据需要配置 GPG 密钥有效期
Key does not expire at all
Is this correct? (y/N) y                  //再次确认配置
GnuPG needs to construct a user ID to identify your key.

Real name: gitcode                        //配置您的姓名
Email address: email@gitcode.com          //配置您的邮箱,注意邮箱必须要与 GitCode 的默认邮箱一致
Comment:
You selected this USER-ID:
    "gitcode <email@gitcode.com>"

Change (N)ame, (C)omment, (E)mail or (O)kay/(Q)uit? o  //配置不变,之后会弹出密码输入框,输入密码后继续
列出GPG密钥,以找到您的公钥ID:
gpg --list-keys
- 导出GPG公钥(替换
YOUR_KEY_ID为您的公钥ID):
gpg --armor --export YOUR_KEY_ID
通过软件直接生成和导出GPG公钥
除了上述命令行的方式,我们也可以通过刚才安装�的 GPG Keychain 软件创建并导出 GPG 公钥,注意邮箱必须要与 GitCode 的默认邮箱一致。
Linux系统获取GPG公钥
在大多数 Linux 发行版中,GPG 通常已预装。如果未安装,您可以通过包管理器安装 GPG。
安装GPG
-
对于基于 Debian 的系统(如 Ubuntu):
sudo apt-get install gnupg -
对于基于 RPM 的系统(如 Fedora):
sudo dnf install gnupg
生成和导出GPG公钥
打开 终端,然后使用以下命令:
生成新的GPG密钥对(如果您还没有):
gpg --full-generate-key
按照页面提示生成GPG 密钥:
Please select what kind of key you want:
    (1) RSA and RSA
    (2) DSA and Elgamal
    (3) DSA (sign only)
    (4) RSA (sign only)
    (9) ECC (sign and encrypt) *default*
    (10) ECC (sign only)
    (14) Existing key from card
Your selection? 1                        //建议选择 RSA and RSA类型的密钥
RSA keys may be between 1024 and 4096 bits long.
What keysize do you want? (3072) 4096    //为保障安全性,建议长度为 4096
Requested keysize is 4096 bits
Please specify how long the key should be valid.
            0 = key does not expire
        <n>  = key expires in n days
        <n>w = key expires in n weeks
        <n>m = key expires in n months
        <n>y = key expires in n years
Key is valid for? (0)                     //根据需要配置 GPG 密钥有效期
Key does not expire at all
Is this correct? (y/N) y                  //再次确认配置
GnuPG needs to construct a user ID to identify your key.

Real name: gitcode                        //配置您的姓名
Email address: email@gitcode.com          //配置您的邮箱,注意邮箱必须要与 GitCode 的默认邮箱一致
Comment:
You selected this USER-ID:
    "gitcode <email@gitcode.com>"

Change (N)ame, (C)omment, (E)mail or (O)kay/(Q)uit? o  //配置不变,之后会弹出1密码输入框,输入密码后继续
列出GPG密钥,以找到您的公钥ID:
gpg --list-keys
导出GPG公钥(替换 YOUR_KEY_ID 为您的公钥ID):
gpg --armor --export YOUR_KEY_ID
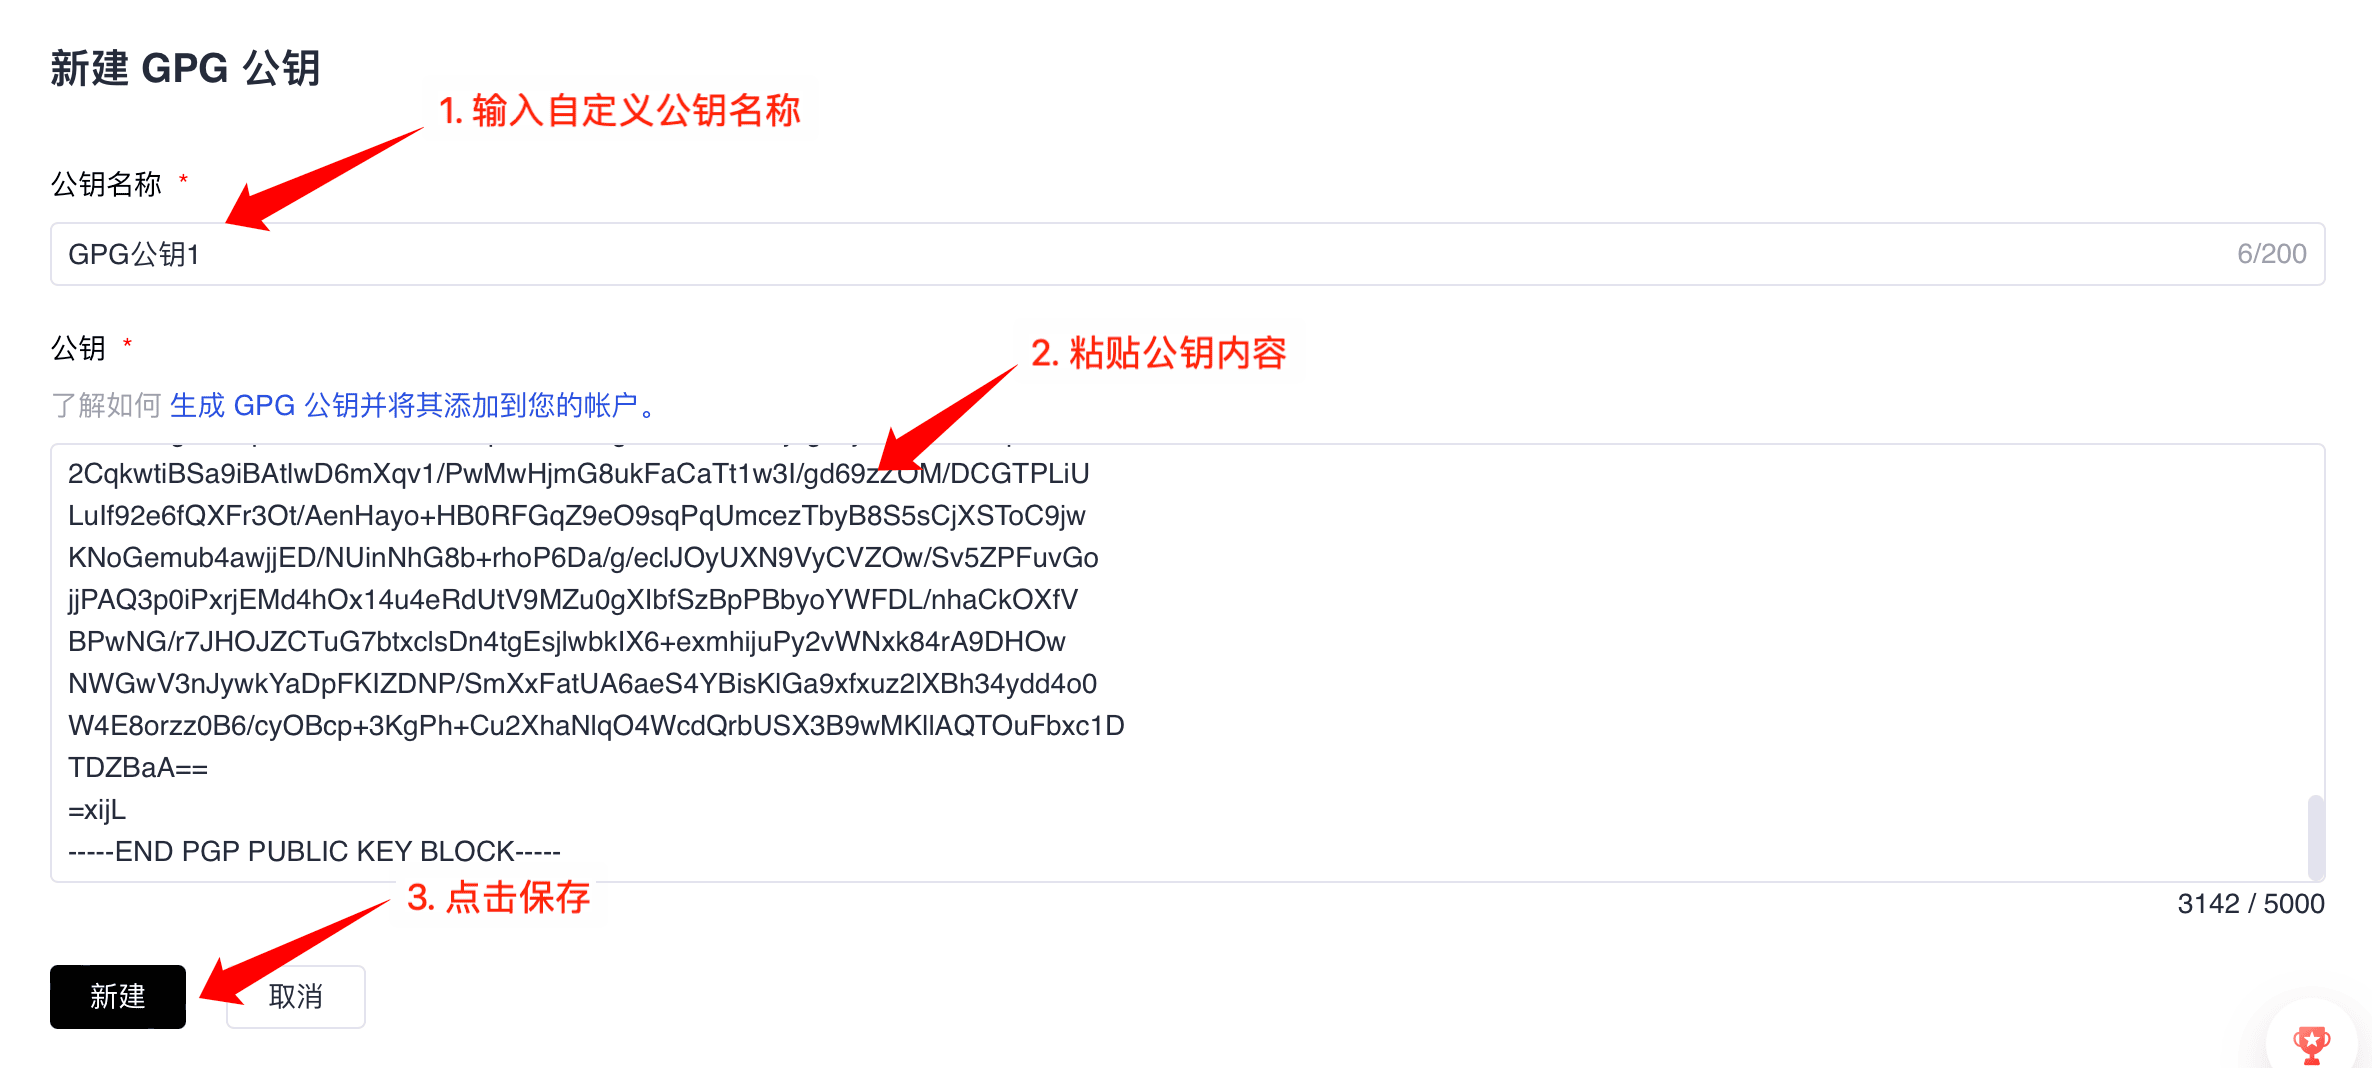
在 GitCode 平台上配置 GPG公钥
-
登录 GitCode,登录 GitCode,进入 「个人设置」 -> 「安全设置」 -> 「GPG 公钥」
-
点击”+ GPG 公钥”
-
在“公钥名称”一栏中,为公钥添加一个描述性名称
-
将导出的 GPG 公钥粘贴到“公钥”文本框中
-
点击”新建”完成操作
-
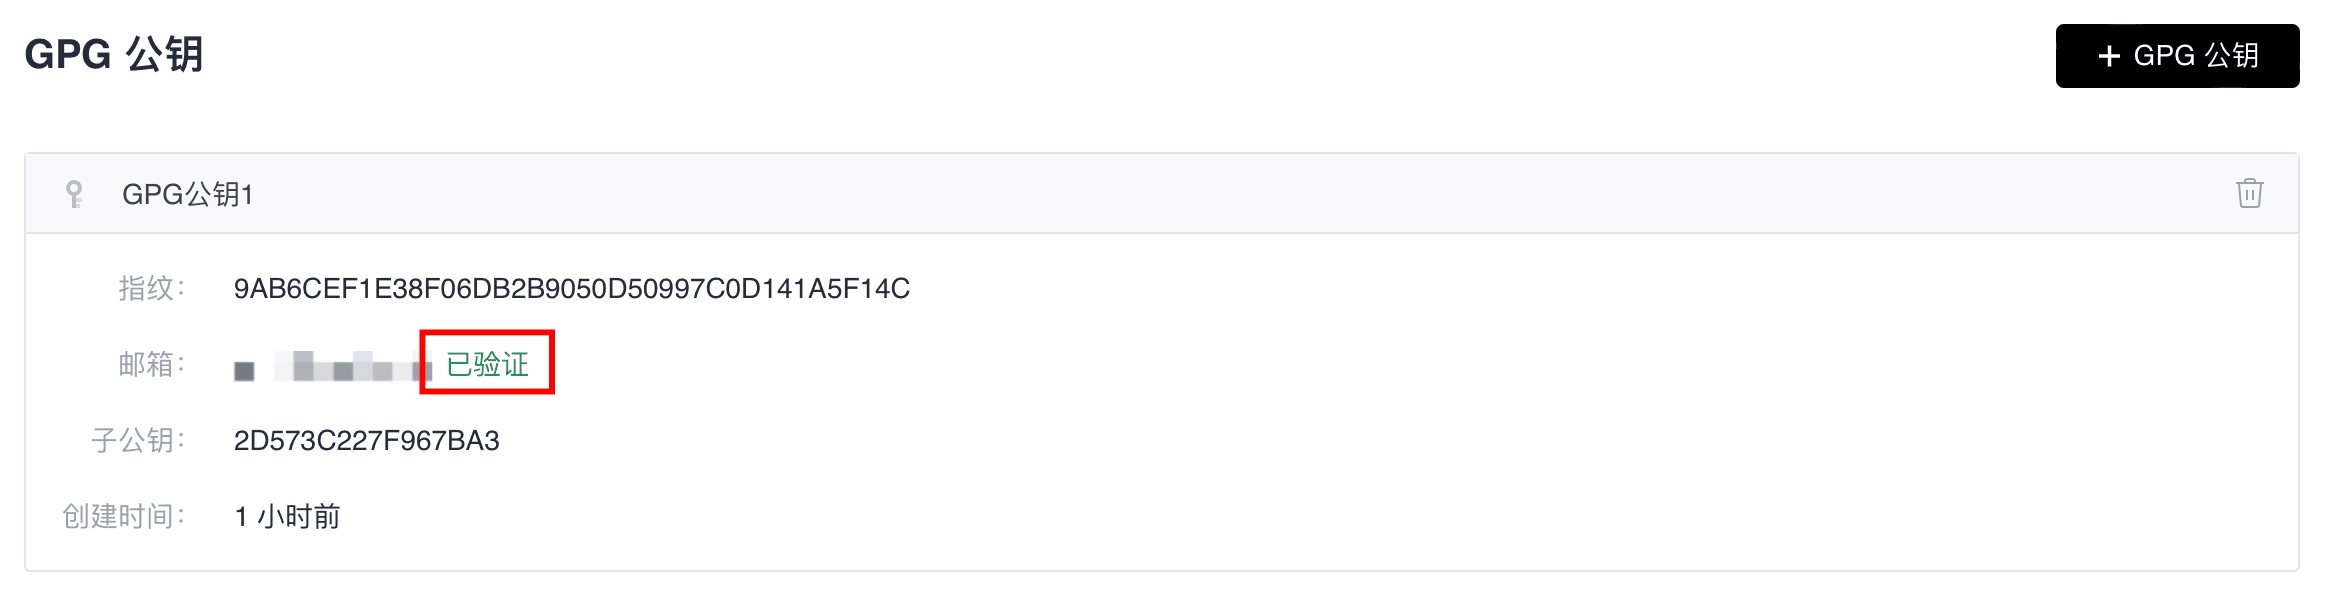
出现“已验证”表示新建成功

现在,您已经成功获取了您的GPG公钥,可以在 GitCode 上配置此 GPG 公钥,用于加密通信或验证签名
注意,GPG 邮箱为当前用户已添加邮箱 验证才能通过。